How To Create A Windows 7 Usb Installer On Mac
How can I make a bootable Windows installation USB on Mac OS X? After upgrading to macOS Mojave, you may find that Boot Camp Assistant is no longer supported and thus creating a bootable USB turns out to be a little bit challenging. In this tutorial we’ll show you how to create Windows 10 bootable USB from ISO on Mac, by using the Terminal or third-party software like UNetbottin.
Method 1: Create Windows 10 Bootable USB on Mac Using UNetbottin
UNetbootin is a free, open source utility that allows you to create bootable USB drives on Windows, Linux, and Mac OS X. If you’ve downloaded Windows 10 ISO image, here is how you can create a bootable Windows installer USB on Mac using UNetbootin.
- Plug a USB drive into your Mac and open Disk Utility. Select your USB drive from the left panel and click on Info button. Note down the device name since we will need that later.
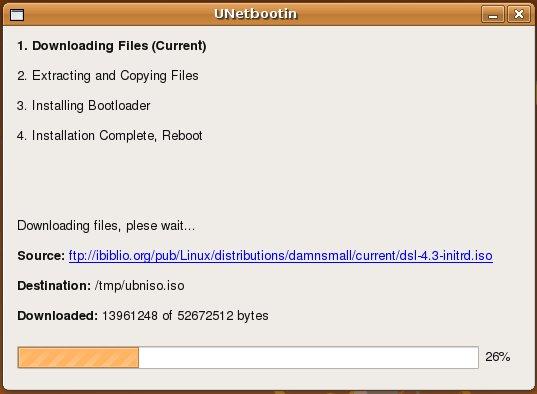
- Next, download and launch the UNetbottin utility. Select the “Diskimage” radio button, click “…” to select a bootable ISO image.
- After locating your Windows 10 ISO file, click on Open.
- Choose Type as USB Drive and select the device name of your USB drive (you probably would’ve noted it down earlier, so refer to that). Click OK to start installing to the USB drive.
- This process takes several minutes or longer, depending on the size of your selected ISO image.
I don't have my superdrive in my macbook so I'm trying to install windows 7 using bootcamp and the USB stick. I made a 100GB partition on my SSD to use for windows using bootcamp. When I restart and hold the alt key, my bootable USB for windows 7 never appears.
Method 2: Create Windows 10 Bootable USB on Mac Using Terminal

Of course, if you prefer not to use third-party software, you can still use the excellent Terminal app, which is a little bit more involved, but no additional software needs to be installed. Follow these steps:
- After connecting a USB drive to your Mac, open a Terminal window and type diskutil list to display all the disks attached to your machine. You have to figure out the disk identifier of the USB drive you need to format. In my example, my USB drive is mounted as “disk2” and it’s about 32GB.
- Next, run the following command to format your USB drive and name it “WIN10“, where # is a placeholder for the disk identifier of your USB drive.
diskutil eraseDisk MS-DOS 'WIN10' GPT disk# - Now, mount your Windows 10 ISO image with the command below, assuming it’s saved the Downloads folder. In my case, it is mounted as a volume named “ESD-ISO“.
hdiutil mount ~/Downloads/your_windows_10_image.iso - Finally, run the following command to copy all the files from the mounted ISO to your USB drive.
cp -rp /Volumes/ESD-ISO/* /Volumes/WIN10/This command will take a while, and once it finishes, you can disconnect the mounted ISO with this command:
hdiutil unmount /Volumes/ESD-ISO - Now you should be able to boot from the USB to install Windows 10 on your Mac or Windows machine.
Conclusion
These should be the easiest ways to create a Windows 10 bootable USB from ISO on Mac, without using Boot Camp Assistant. No matter which method you prefer, be sure that you backup any important data on your USB drive, as the procedure of creating bootable USB will delete everything on it.
Related posts:
If you want to create a Windows 10/8/7 bootable USB on Mac and don't know how to do it, then this article can help you a lot. Creating bootable Windows 10/8/7 USB on Mac with or without Bootcamp can be done by anyone. It's not just about creating a bootable Windows USB, it's about efficiently learning the process and executing it properly so that you don't face any problems while doing it.Part 1. How to Create A Bootable Windows 10/8/7 USB on Mac with BootcampCreating a bootable Windows 10/8/7 USB with Bootcamp is really easy.
All you need to do is follow the right process and your job will be done. Here is how you can do it:Step 1. Insert an 8GB USB Flash drive into your Mac.Step 2. Now run Bootcamp Assistant, select the box for 'Create a Windows 7 or later version install disk' and uncheck 'Install Windows 7 or later version.' Click Continue to go for the next step.Step 3.
Download a Windows 10/8/7.iso file and keep it in the Downloads folder.Step 4. Bootcamp will automatically locate the.iso file in your Downloads folder.
Also you can make sure by using the 'Choose' button and locating the file.Step 5. Now click continue and it can take some time to format and set up the USB installer on the Mac.Step 6. When the process is complete, the USB drive will be renamed to 'WININSTALL'.
Now click 'Quit' to exit the app and then 'Eject' the USB drive from your Mac.You may also like: Part 2. How to Create A Bootable Windows 10/8/7 USB on Mac without BootcampThis process is a complicated one so it's highly recommended that you follow each and every instruction properly. Here is a clear and precise instruction on how to create a bootable Windows 10/8/7 USB on Mac without Bootcamp:Step 1. Download a Windows.iso file.Step 2. Connect your USB flash drive into your Mac and you must make sure that it has 8 GB space in it.Step 3. Format the USB flash drive to FAT32 by using 'Disk Utility' feature.
Ensure you select FAT32 and Master Boot Record in the options:Step 4. Open Terminal and run command: diskutil list.Step 5. Now from the output, find out the name of the USB drive.
It should be something like – /dev/diskX. X is the number of the drive.Step 6. Then type command: diskutil unmountDisk /dev/disk2It will print something like this: Unmount of all volumes on disk2 was successful.Then type: sudo dd if=/path/to/win-iso-file of=/dev/disk2 bs=1mThis will also ask for your Mac password. Type it in and click on return.Step 7. The process will start but there will be no output for a while. It might take quite some time so you need to be patient. Once it's complete, it will output records in/out and bytes transferred.Step 8.
Neverwinter mod 13 release date 1. Modules are major updates to the game that introduce new content such as campaigns, races, classes, adventure zones, dungeons and skirmishes. Fury of the Feywild.
Type: diskutil eject /dev/disk2Now, re-plug the USB drive and check its contents. It will have files and folders but especially a setup.exe and an autorun.inf file. The process is fully complete.Part 3. How to Create A Bootable Windows 10/8/7 USB on Mac with PassFab 4WinKeyIt's not an easy way to create a bootable disk without professional tool, right? There is a highly recommended thing that will be a very useful tool for you, It's. It enables you to create bootable disk on Mac and reset/remove passwords for Windows within 5 minutes, and you don't need to enter the complicated code or search for a specific folder.
Keep reading to know more.Step 1. Download, install and run 4WinKey for Mac to an accessible Mac machine.